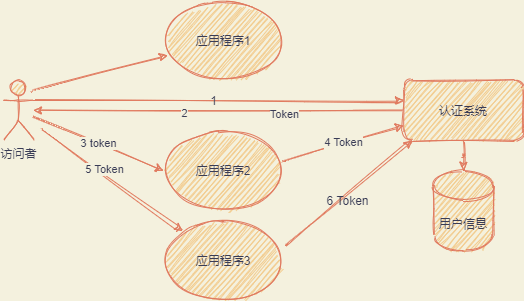
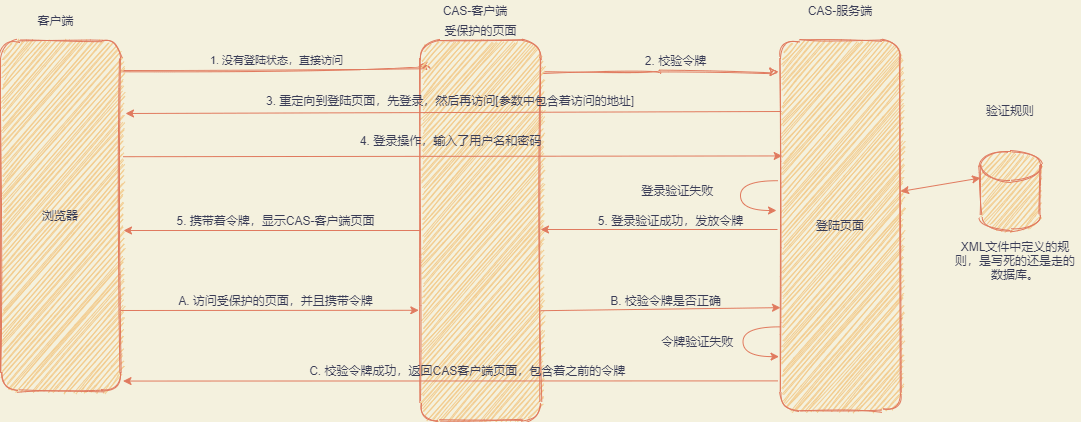
Loading... # CAS入门 ## 单点登录 单点登录(Single Sign On)-->(SSO),意思就是在一个应用上登录后,在其他应用上也保留登录状态。 ## What's CAS CAS是耶鲁大学发起的开源项目,巴拉巴拉巴拉~~,主要是为了解决单点登录的问题,大概流程是这样的。  ## 步骤 1. 访问服务:SSO客户端发送请求访问应用系统提供的服务资源 2. 定向认证:SSO客户端会重定向用户请求到SSO服务器 3. 用户认证:用户身份的认证 4. 发放令牌:SSO服务器产生令牌(Service Ticket) 5. 验证令牌:SSO服务器校验令牌(Service Ticket)的合法性,通过后允许客户端访问服务 6. 传输用户信息:SSO服务器验证令牌通过后,传输认证结果给客户端  ## CAS服务器端部署 > CAS 服务端是war包,所以需要服务器的支撑,这里以Tomcat为例。 > > 这里以Windows平台为例,Tomcat部署到了本机 把cas.war放到webapp下,启动tomcat。 启动后访问http:/localhost:8080/cas/login 此时你会看到登陆页面,默认的登录用户名和密码是固定的,casuser/Mellon ### 修改默认用户名和密码 找到cas/WEB-INF/deployerConfigContext.xml ```xml <bean id="primaryAuthenticationHandler" class="org.jasig.cas.authentication.AcceptUsersAuthenticationHandler"> <property name="users"> <map> <entry key="casuser" value="Mellon" /> </map> </property> </bean> ``` 这里我们发现,用户名和密码是成对存在的,并且写死了,对于部署真实项目是远远不能满足需求的,但是有没有发现,bean关键字,想到了Spring。那我们能不能使用MySQL呢?答案是可以的。 ### 从MySQL中认证用户 这里我们可以尝试使用曾经的连接池和MySQL驱动,对接到CAS中,我们从上面的XML中可以看到,bean的id为primaryAuthenticationHandler,也就是主要的认证处理者,处理者是用户名和密码的键值对,那么我们由CAS的QueryDatabaseAuthenticationHandler进行对接就好了。 对于认证我们的查询压力以及性能的的考虑,我们使用连接池进行操作。从上面的XML我呢见中,我们也可以发现,验证部分在deployerConfigContext.xml文件中,所以我们自己定义bean,并且让我们自己的bean来处理认证过程。 ```xml <bean id="dataSource" class="com.mchange.v2.c3p0.ComboPooledDataSource" p:driverClass="com.mysql.jdbc.Driver" p:jdbcUrl="jdbc:mysql://127.0.0.1:3306/casDemo?characterEncoding=utf8" p:user="study" p:password="123456" /> <bean id="passwordEncoder" class="org.jasig.cas.authentication.handler.DefaultPasswordEncoder" c:encodingAlgorithm="MD5" p:characterEncoding="UTF-8" /> <bean id="dbAuthHandler" class="org.jasig.cas.adaptors.jdbc.QueryDatabaseAuthenticationHandler" p:dataSource-ref="dataSource" p:sql="select password from t_user where username = ?" p:passwordEncoder-ref="passwordEncoder" /> ``` 这时,我们需要把默认的处理器换成我们自己的。dbAuthHandler ```xml <entry key-ref="dbAuthHandler" value-ref="primaryPrincipalResolver" /> ``` :warning: 注意,如果是连接其他机器,应该把数据库的远程访问权限打开(创建远程访问的账号[%] 或者针对某一个IP地址,具体情况具体操作) ### 更改端口号 如果开放了多个Web应用,端口冲突或者分布式情况,有修改端口号需求的,修改Tomcat的ip就不用说了,这里是需要修改CAS的配置,找到WEB-INF/cas.properties,修改server.name属性值,具体到tomcat的端口,也就是说要做到匹配。 ```properties server.name=http://127.0.0.1:9100 server.prefix=${server.name}/cas ``` ### HTTPS认证 HTTPS(http+ssl)也就是超文本传输协议+安全套接字==超文本传输安全协议,使连接更加安全,详细的说明可以参考维基百科(https://zh.wikipedia.org/wiki/超文本传输安全协议) 但是在测试阶段,我们没有购买安全证书,虽然可以自己生成,但是为了方便,管理https的认证,如果不关闭认证,是无法进行登录的。 1. 修改cas的WEB-INF/deployerConfigContext.xml,找到如下部分代码,在下面需要添加p:requireSecure="false"。也就是需要安全置为假 ```xml <bean class="org.jasig.cas.authentication.handler.support.HttpBasedServiceCredentialsAuthenticationHandler" p:httpClient-ref="httpClient" p:requireSecure="false"/> ``` 2. 修改cas的/WEB-INF/spring-configuration/ticketGrantingTicketCookieGenerator.xml,把p:cookieSecure="true"改成false,但是cookieMaxAge为-1时也就是当前窗口有效,打开其他窗口就仍需要重新授权,所以时间也可以进行修改。 ```xml <bean id="ticketGrantingTicketCookieGenerator" class="org.jasig.cas.web.support.CookieRetrievingCookieGenerator" p:cookieSecure="false" p:cookieMaxAge="3600" p:cookieName="CASTGC" p:cookiePath="/cas" /> ``` 3. 修改cas的WEB-INF/spring-configuration/warnCookieGenerator.xml,同上 ```xml <bean id="warnCookieGenerator" class="org.jasig.cas.web.support.CookieRetrievingCookieGenerator" p:cookieSecure="false" p:cookieMaxAge="3600" p:cookieName="CASPRIVACY" p:cookiePath="/cas" /> ``` ## CAS客户端的搭建 依旧是Maven工程,web项目所以使用war进行打包,引入CAS客户端依赖和Tomcat的依赖。 ```xml <packaging>war</packaging> <properties> <webVersion>3.0</webVersion> </properties> <dependencies> <!-- cas --> <dependency> <groupId>org.jasig.cas.client</groupId> <artifactId>cas-client-core</artifactId> <version>3.3.3</version> </dependency> <dependency> <groupId>javax.servlet</groupId> <artifactId>servlet-api</artifactId> <version>2.5</version> <scope>provided</scope> </dependency> </dependencies> <build> <plugins> <plugin> <artifactId>maven-compiler-plugin</artifactId> <configuration> <source>1.8</source> <target>1.8</target> </configuration> </plugin> <plugin> <groupId>org.apache.tomcat.maven</groupId> <artifactId>tomcat7-maven-plugin</artifactId> <configuration> <port>9001</port> <path>/</path> </configuration> </plugin> </plugins> </build> ``` web.xml ```xml <?xml version="1.0" encoding="UTF-8"?> <web-app xmlns:xsi="http://www.w3.org/2001/XMLSchema-instance" xmlns="http://java.sun.com/xml/ns/javaee" xsi:schemaLocation="http://java.sun.com/xml/ns/javaee http://java.sun.com/xml/ns/javaee/web-app_2_5.xsd" version="2.5"> <!--登录认证过滤器--> <filter> <filter-name>CASFilter</filter-name> <!--过滤器名称--> <filter-class>org.jasig.cas.client.authentication.AuthenticationFilter</filter-class> <!--由cas客户端认证进行过滤--> <init-param> <!--初始化参数--> <param-name>casServerLoginUrl</param-name> <!--CAS服务器登录地址--> <param-value>http://127.0.0.1:9100/cas/login</param-value> <!--CAS服务器地址值--> </init-param> <init-param> <param-name>serverName</param-name> <!-- 服务名称,也就是本应用的 --> <param-value>http://localhost:9001</param-value> <!--本应用的地址--> </init-param> </filter> <filter-mapping> <filter-name>CASFilter</filter-name> <!--CAS过滤器定义--> <url-pattern>/*</url-pattern> <!--本应用下的所有地址,如果可以访问部分页面,可以使用多个url-pattern--> </filter-mapping> <!-- 凭据认证过滤器--> <filter> <filter-name>casValidationFilter</filter-name> <!--CAS验证过滤器--> <filter-class>org.jasig.cas.client.validation.Cas20ProxyReceivingTicketValidationFilter</filter-class> <!--CAS凭证验证过滤器--> <init-param> <param-name>casServerUrlPrefix</param-name> <!--CAS服务器验证地址,因为这里我们用的都是同一个,所以同上。--> <param-value>http://127.0.0.1:9100/cas</param-value> </init-param> <init-param> <param-name>serverName</param-name> <param-value>http://localhost:9001</param-value> </init-param> </filter> <filter-mapping> <filter-name>casValidationFilter</filter-name> <url-pattern>/*</url-pattern> </filter-mapping> <!-- 针对HttpServletRequest请求--> <filter> <filter-name>CasHttpRequestFilter</filter-name> <filter-class>org.jasig.cas.client.util.HttpServletRequestWrapperFilter</filter-class> </filter> <filter-mapping> <filter-name>CasHttpRequestFilter</filter-name> <url-pattern>/*</url-pattern> </filter-mapping> <!-- 网上说的都是获取登录用户名的过滤器,但是这里并不理解时什么意思--> <!-- github 上的解释如下--> <!-- Places the Assertion in a ThreadLocal for portions of the application that need access to it. This is useful when the Web application that this filter "fronts" needs to get the Principal name, but it has no access to the HttpServletRequest, hence making getRemoteUser() call impossible.--> <!-- 我的理解是,在集群情况下,获取当前用户时,会把当前的断言对象放到当前线程内,不用在从session或request中取,也就是断言对象的副本。--> <filter> <filter-name>casLocalFilter</filter-name> <filter-class>org.jasig.cas.client.util.AssertionThreadLocalFilter</filter-class> </filter> <filter-mapping> <filter-name>casLocalFilter</filter-name> <url-pattern>/*</url-pattern> </filter-mapping> <!-- 退出登录监听器过滤器--> <listener> <listener-class>org.jasig.cas.client.session.SingleSignOutHttpSessionListener</listener-class> </listener> <filter> <filter-name>casSingOutFilter</filter-name> <filter-class>org.jasig.cas.client.session.SingleSignOutFilter</filter-class> </filter> <filter-mapping> <filter-name>casSingOutFilter</filter-name> <url-pattern>/*</url-pattern> </filter-mapping> </web-app> ``` 接下来运行这个客户端,发现是需要登录的,当我们创建一个客户端副本,改下端口,运行两个客户端,一个客户端登陆后,第二个客户端就不需要再次登录了。也就是单点登录的特性。 ### 附加戏 登出处理,可以加一个a标签,或者访问地址 ``` http://127.0.0.1:9000/cas/logout ``` 如果想要退出后自动跳转到一个地址,需要修改一下配置。找到cas-servlet.xml,进行如下修改,把followServiceRedirects改为true ```xml <bean id="logoutAction" class="org.jasig.cas.web.flow.LogoutAction" p:servicesManager-ref="servicesManager" p:followServiceRedirects="${cas.logout.followServiceRedirects:true}"/> ``` 此时,可以将地址改为这样。 ``` http://127.0.0.1:9100/cas/logout?service=http://www.zunmx.top ``` ## 修改默认页面 找到WEB-INF\view\jsp\default\ui\casLoginView.jsp,这个文件就是默认的登陆页面,进行修改就行了,但是需要注意的是,要遵循它的规则,比如用户名和密码输入框的属性以及jsp的规则。 头部属性添加 ```jsp <%@ page pageEncoding="UTF-8" %> <%@ page contentType="text/html; charset=UTF-8" %> <%@ taglib prefix="c" uri="http://java.sun.com/jsp/jstl/core" %> <%@ taglib prefix="spring" uri="http://www.springframework.org/tags" %> <%@ taglib prefix="form" uri="http://www.springframework.org/tags/form" %> <%@ taglib prefix="fn" uri="http://java.sun.com/jsp/jstl/functions" %> ``` 比如下面的代码,遵循原生的模板 ```jsp <form:form method="post" id="fm1" commandName="${commandName}" htmlEscape="true" class="sui-form"> <form:input id="username" tabindex="1" accesskey="${userNameAccessKey}" path="username" autocomplete="off" htmlEscape="true" placeholder="邮箱/用户名/手机号" class="span2 input-xfat" /> <form:password id="password" tabindex="2" path="password" accesskey="${passwordAccessKey}" htmlEscape="true" autocomplete="off" placeholder="请输入密码" class="span2 input-xfat" /> <input type="hidden" name="lt" value="${loginTicket}" /> <input type="hidden" name="execution" value="${flowExecutionKey}" /> <input type="hidden" name="_eventId" value="submit" /> <input class="sui-btn btn-block btn-xlarge btn-danger" accesskey="l" value="登陆" type="submit" /> </form:form> ``` 错误提示部分 ```jsp <form:errors path="*" id="msg" cssClass="errors" element="div" htmlEscape="false" /> ``` 接下来修改默认的语言(I18N),找到WEB-INF\classes,CAS提供了国际化的语言配置文件,简体中文的文件是messages_zh_CN.properties,但是缺少了一些说明,我们补一下。 ```properties authenticationFailure.AccountNotFoundException=\u7528\u6237\u4E0D\u5B58\u5728. authenticationFailure.FailedLoginException=\u5BC6\u7801\u9519\u8BEF. ``` 然后修改默认的语言,找到cas-servlet.xml文件,修改如下。 ```xml <bean id="localeResolver" class="org.springframework.web.servlet.i18n.CookieLocaleResolver" p:defaultLocale="zh_CN" /> ``` ## 集成SpringSecurity ### 导入Maven依赖 ```xml <?xml version="1.0" encoding="UTF-8"?> <project xmlns="http://maven.apache.org/POM/4.0.0" xmlns:xsi="http://www.w3.org/2001/XMLSchema-instance" xsi:schemaLocation="http://maven.apache.org/POM/4.0.0 http://maven.apache.org/xsd/maven-4.0.0.xsd"> <modelVersion>4.0.0</modelVersion> <groupId>com.alc</groupId> <artifactId>casClient_demo3</artifactId> <version>1.0-SNAPSHOT</version> <packaging>war</packaging> <properties> <webVersion>3.0</webVersion> <spring.version>4.2.4.RELEASE</spring.version> </properties> <dependencies> <dependency> <groupId>org.springframework.security</groupId> <artifactId>spring-security-cas</artifactId> <version>4.1.0.RELEASE</version> </dependency> <dependency> <groupId>org.jasig.cas.client</groupId> <artifactId>cas-client-core</artifactId> <version>3.3.3</version> <exclusions> <exclusion> <groupId>org.slf4j</groupId> <artifactId>log4j-over-slf4j</artifactId> </exclusion> </exclusions> </dependency> <dependency> <groupId>org.springframework.security</groupId> <artifactId>spring-security-cas</artifactId> <version>4.1.0.RELEASE</version> </dependency> <dependency> <groupId>org.jasig.cas.client</groupId> <artifactId>cas-client-core</artifactId> <version>3.3.3</version> <exclusions> <exclusion> <groupId>org.slf4j</groupId> <artifactId>log4j-over-slf4j</artifactId> </exclusion> </exclusions> </dependency> <dependency> <groupId>org.springframework</groupId> <artifactId>spring-core</artifactId> <version>${spring.version}</version> </dependency> <dependency> <groupId>org.springframework</groupId> <artifactId>spring-web</artifactId> <version>${spring.version}</version> </dependency> <dependency> <groupId>org.springframework</groupId> <artifactId>spring-webmvc</artifactId> <version>${spring.version}</version> </dependency> <dependency> <groupId>org.springframework</groupId> <artifactId>spring-context-support</artifactId> <version>${spring.version}</version> </dependency> <dependency> <groupId>org.springframework</groupId> <artifactId>spring-test</artifactId> <version>${spring.version}</version> </dependency> <dependency> <groupId>org.springframework</groupId> <artifactId>spring-jdbc</artifactId> <version>${spring.version}</version> </dependency> <dependency> <groupId>org.springframework.security</groupId> <artifactId>spring-security-web</artifactId> <version>4.1.0.RELEASE</version> </dependency> <dependency> <groupId>org.springframework.security</groupId> <artifactId>spring-security-config</artifactId> <version>4.1.0.RELEASE</version> </dependency> <dependency> <groupId>javax.servlet</groupId> <artifactId>servlet-api</artifactId> <version>2.5</version> <scope>provided</scope> </dependency> </dependencies> <build> <plugins> <plugin> <artifactId>maven-compiler-plugin</artifactId> <configuration> <source>1.8</source> <target>1.8</target> </configuration> </plugin> <!-- 配置Tomcat插件 --> <plugin> <groupId>org.apache.tomcat.maven</groupId> <artifactId>tomcat7-maven-plugin</artifactId> <configuration> <path>/</path> <port>9003</port> </configuration> </plugin> </plugins> </build> </project> ``` ### 配置web.xml ```xml <?xml version="1.0" encoding="UTF-8"?> <web-app xmlns:xsi="http://www.w3.org/2001/XMLSchema-instance" xmlns="http://java.sun.com/xml/ns/javaee" xsi:schemaLocation="http://java.sun.com/xml/ns/javaee http://java.sun.com/xml/ns/javaee/web-app_2_5.xsd" version="2.5"> <!-- 配置SpringMVC的DispatcherServlet,也可以配置为继承了DispatcherServlet的自定义类,这里配置springmvc的配置(扫描controller) --> <servlet> <servlet-name>springmvc</servlet-name> <servlet-class>org.springframework.web.servlet.DispatcherServlet</servlet-class> <!-- 指定加载的配置文件 ,通过参数contextConfigLocation加载--> <init-param> <param-name>contextConfigLocation</param-name> <param-value>classpath:springmvc.xml</param-value> </init-param> </servlet> <!--springmvc 映射部分,那些请求由springmvc处理,这里是.do的请求 如果是/就处理所有请求--> <servlet-mapping> <servlet-name>springmvc</servlet-name> <url-pattern>*.do</url-pattern> </servlet-mapping> <!--上下文的配置,也就是加载spring相关的配置,调起spring容器的一步--> <context-param> <param-name>contextConfigLocation</param-name> <param-value>classpath:spring-security.xml</param-value> </context-param> <!-- 定义监听器,该类作为spring的listener使用,它会在创建时自动查找web.xml配置的applicationContext.xml文件 --> <listener> <listener-class> org.springframework.web.context.ContextLoaderListener </listener-class> </listener> <!--定义过滤器链--> <filter> <filter-name>springSecurityFilterChain</filter-name> <filter-class>org.springframework.web.filter.DelegatingFilterProxy</filter-class> </filter> <!--拦截所有请求--> <filter-mapping> <filter-name>springSecurityFilterChain</filter-name> <url-pattern>/*</url-pattern> </filter-mapping> </web-app> ``` ### 配置spring-security ```xml <?xml version="1.0" encoding="UTF-8"?> <beans:beans xmlns="http://www.springframework.org/schema/security" xmlns:beans="http://www.springframework.org/schema/beans" xmlns:xsi="http://www.w3.org/2001/XMLSchema-instance" xsi:schemaLocation="http://www.springframework.org/schema/beans http://www.springframework.org/schema/beans/spring-beans.xsd http://www.springframework.org/schema/security http://www.springframework.org/schema/security/spring-security.xsd"> <!-- entry-point-ref 入口点引用 --> <http pattern="/index2.html" security="none"/> <!--开放的页面,也就是什么角色都可以访问--> <http use-expressions="false" entry-point-ref="casProcessingFilterEntryPoint"> <!--不使用表达式,CAS作为切点介入--> <intercept-url pattern="/**" access="ROLE_USER"/> <!--拦截所有url请求--> <csrf disabled="true"/> <!--禁用跨站请求拦截--> <!-- custom-filter为过滤器, position 表示将过滤器放在指定的位置上,before表示放在指定位置之前 ,after表示放在指定的位置之后 --> <custom-filter ref="casAuthenticationFilter" position="CAS_FILTER"/> <!--CAS认证过滤器--> <custom-filter ref="requestSingleLogoutFilter" before="LOGOUT_FILTER"/> <!--登出请求过滤器--> <custom-filter ref="singleLogoutFilter" before="CAS_FILTER"/> <!--单点登出请求过滤器--> </http> <!-- CAS入口点 开始 --> <beans:bean id="casProcessingFilterEntryPoint" class="org.springframework.security.cas.web.CasAuthenticationEntryPoint"> <!-- 单点登录服务器登录URL --> <beans:property name="loginUrl" value="http://127.0.0.1:9100/cas/login"/> <beans:property name="serviceProperties" ref="serviceProperties"/> </beans:bean> <beans:bean id="serviceProperties" class="org.springframework.security.cas.ServiceProperties"> <!--service 配置自身工程的根地址+/login/cas --> <beans:property name="service" value="http://localhost:9003/login/cas"/> </beans:bean> <!-- CAS入口点 结束 --> <!-- 认证过滤器 开始 --> <beans:bean id="casAuthenticationFilter" class="org.springframework.security.cas.web.CasAuthenticationFilter"> <beans:property name="authenticationManager" ref="authenticationManager"/> </beans:bean> <!-- 认证管理器 --> <authentication-manager alias="authenticationManager"> <authentication-provider ref="casAuthenticationProvider"/> </authentication-manager> <!-- 认证提供者 --> <beans:bean id="casAuthenticationProvider" class="org.springframework.security.cas.authentication.CasAuthenticationProvider"> <beans:property name="authenticationUserDetailsService"> <beans:bean class="org.springframework.security.core.userdetails.UserDetailsByNameServiceWrapper"> <beans:constructor-arg ref="userDetailsService"/> </beans:bean> </beans:property> <beans:property name="serviceProperties" ref="serviceProperties"/> <!-- ticketValidator 为票据验证器 --> <beans:property name="ticketValidator"> <beans:bean class="org.jasig.cas.client.validation.Cas20ServiceTicketValidator"> <beans:constructor-arg name="casServerUrlPrefix" value="http://127.0.0.1:9100/cas"/> </beans:bean> </beans:property> <beans:property name="key" value="an_id_for_this_auth_provider_only"/> </beans:bean> <!-- 认证类 --> <beans:bean id="userDetailsService" class="com.alc.demo.service.UserDetailServiceImpl"/> <!-- 认证过滤器 结束 --> <!-- 单点登出 开始 --> <beans:bean id="singleLogoutFilter" class="org.jasig.cas.client.session.SingleSignOutFilter"/> <beans:bean id="requestSingleLogoutFilter" class="org.springframework.security.web.authentication.logout.LogoutFilter"> <beans:constructor-arg value="http://127.0.0.1:9100/cas/logout?service=http://www.zunmx.top"/> <beans:constructor-arg> <beans:bean class="org.springframework.security.web.authentication.logout.SecurityContextLogoutHandler"/> </beans:constructor-arg> <beans:property name="filterProcessesUrl" value="/logout/cas"/> <!--登出的地址--> </beans:bean> <!-- 单点登出 结束 --> </beans:beans> ``` ### 配置springmvc ```xml <?xml version="1.0" encoding="UTF-8"?> <beans xmlns="http://www.springframework.org/schema/beans" xmlns:xsi="http://www.w3.org/2001/XMLSchema-instance" xmlns:p="http://www.springframework.org/schema/p" xmlns:context="http://www.springframework.org/schema/context" xmlns:mvc="http://www.springframework.org/schema/mvc" xsi:schemaLocation="http://www.springframework.org/schema/mvc http://www.springframework.org/schema/mvc/spring-mvc.xsd http://www.springframework.org/schema/beans http://www.springframework.org/schema/beans/spring-beans.xsd http://www.springframework.org/schema/context http://www.springframework.org/schema/context/spring-context.xsd"> <context:component-scan base-package="com.alc.demo" /> <mvc:annotation-driven /> </beans> ``` ### 配置认证时使用的用户服务(UserDetailsService) ```java package com.alc.demo.service; import org.springframework.security.core.GrantedAuthority; import org.springframework.security.core.authority.SimpleGrantedAuthority; import org.springframework.security.core.userdetails.User; import org.springframework.security.core.userdetails.UserDetails; import org.springframework.security.core.userdetails.UserDetailsService; import org.springframework.security.core.userdetails.UsernameNotFoundException; import java.util.ArrayList; import java.util.List; public class UserDetailServiceImpl implements UserDetailsService { @Override public UserDetails loadUserByUsername(String username) throws UsernameNotFoundException { List<GrantedAuthority> authorities=new ArrayList(); authorities.add(new SimpleGrantedAuthority("ROLE_USER")); return new User(username, "" , authorities); } } ``` 因为授权认证由CAS做了,所以Spring-Security赋予角色就够了。 ### 配置controller层 ```java package com.alc.demo.controller; import org.springframework.security.core.context.SecurityContextHolder; import org.springframework.web.bind.annotation.RequestMapping; import org.springframework.web.bind.annotation.RestController; @RestController public class UserController { @RequestMapping("/findLoginUser") public void findLoginUser(){ String name = SecurityContextHolder.getContext().getAuthentication().getName(); System.out.println(name); } } ``` ## 定义默认的页面 ```jsp <%-- Created by IntelliJ IDEA. User: 36083 Date: 2021/04/13 Time: 10:37 To change this template use File | Settings | File Templates. --%> <%@ page contentType="text/html;charset=UTF-8" language="java" %> <html> <head> <title>Title</title> </head> <body> success<br/> <a href="/logout/cas">退出登录</a> </body> </html> ``` © 禁止转载 打赏 赞赏作者 支付宝微信 赞 如果觉得我的文章对你有用,请随意赞赏